Basic Vocal Mixing tutorial
For this basic tutorial I'll try to only use the most default plugins in a DAW so that this method can be accessible to everyone.
If you want a version more advanced I will make an update later detailing my regular process!!
Plugins and Their Order

1. EQ (for cutting frequencies)
2. Multiband Compressor (for compressing the low-mid frequencies only)
3. Compressor (for making the vocal stand out above the instrumental)
4. EQ (for boosting frequencies)
5. Limiter (for catching what the compressor couldn't)
6. a De-esser of some sort (for de-essing, duh!)
7. Reverb (for making the vocals sound less dry)
it's very important to place them specifically in this order, as the plugins affect eachother as long as they're *ABOVE* one another (took me a while to realize this ^^;)
1. EQ
This EQ Will be used for cutting low frequencies, try not to use more than 3 points/bands unless you absolutely have to! Remember, the tip to good EQing is that less is usually more.

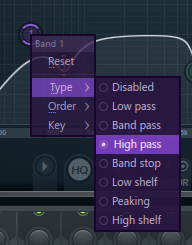
The most crucial part of this is the first band that cuts the low frequencies, this really clears up the muddiness of the vocal and makes it more audible in the middle of the instrumental! I normally right click the band and set the type to high pass. try not to cut too much or the vocal will become shrill and tinny.
Next is the second band, this isn't required but in my opinion it REALLY clears up certain vocals, especially the likes of Miku, Rin and Len. A small dip near the lower part of the mids (not the low-mids) will suffice.
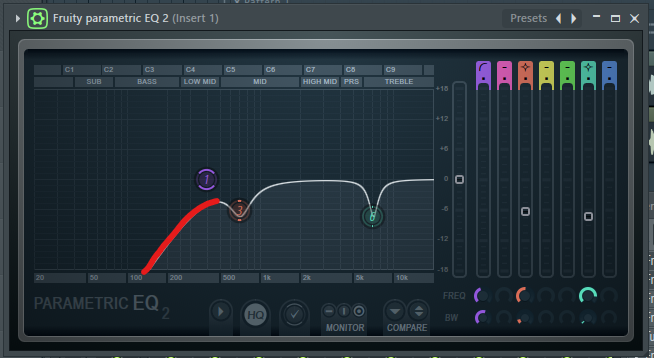

Lastly is the third band, this dip is just to curve some of the shrillness out of the voice, you don't want it to be too close to the top of the treble or it will kill all the sibilance.

2. Multiband Compressor
This is specifically to compress the low-mids and the mids of the vocal, the setup is a little bit intricate but I'll walk you through the gist of it.

I. tweak the four knobs to the left until it looks like this and the top of the pink part is only taking up four squares (you only have to use the last two knobs for this)

II. Set the LOW BAND and HIGH BAND to B (for bypass, since we're not compressing those right now)

III. Lastly, turn down the THRES (threshold) to around -6db on the MID BAND, since we don't want to overcompress it and make the vocals too mid heavy

3. Compressor
The purpose of compressing is not only to even out the volume, but also to turn up the gain of the vocal so it can be heard above the music.

Basically:
Set the Threshold to anywhere from -5db to -9db, it can be adjusted to fit whatever song you're mixing.
Set the Ratio to 3.0, you don't want it to be too high or else it'll be overcompressed.
Set the Gain to around 9-10db, this will ensure the vocals don't duck, but will definitely be heard over the song without having to adjust the entire volume of the track too high.
The rest of the knobs can be adjusted to your discretion but make sure you DON'T OVERCOMPRESS!! Vocalsynths have Engine noise, and that's exactly what you'll hear if you try to turn everything all the way up. As well as the fact that it won't mix into the music and it will just sound like it's floating "above" the instrumental. So be careful.
4. EQ
The purpose of this EQ is to add high end and bring brightness to the voice, it's only one band so it's pretty self explanatory. For FL Studio users, this will effectively replace the "Soundgoodizer"

Right click the band, go to Type and set it to high shelf, then drag it into place. Done!

Be careful not to put it too far back into the 2k range or it'll sound very shrill and hard to listen to. We'll base the rest of the Plugin config around this.
5. Limiter
Honestly this part can be adjusted to your liking for the most part, but you have to be careful not to limit too heavily or the vocal will be too quiet and boomy.

I only adjust the CEIL (ceiling) knob. just turn it down until the loudest part of the vocals aren't as harsh anymore.
6. De-esser
Pretty self explanatory, I use either Maximus (Set to the de-esser split band preset) or a free de-esser plugin found online. If you want to be REAL fancy you can do this manually, but for the purposes of this plugin just use a plugin and adjust it to your liking/until the sibilance sounds suppressed enough.
7. Reverb
This is where I would usually adjust the volume of the entire track at once to try and fit it in with the music. Once it's comfortably sitting in the mix, you can begin to add reverb.

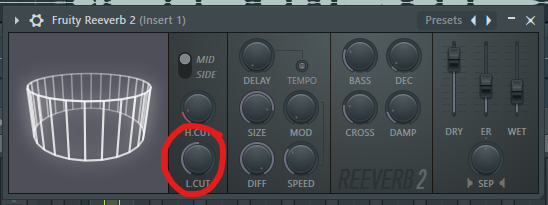
Firstly, adjust the L. CUT (low cut) knob on the bottom left. In most modern reverb plugins, you'll be able to directly see the bands like an EQ, but for the purpose of default FL Studio plugins, turn the knob up about halfway or more, this is to remove any mud from the reverb and make it cleaner sounding.
Next, you can adjust the knob that says SIZE, you'll have to trust your ears on this one, as it varies from song to song, but as a general rule I have it turned up pretty high.

Lastly, adjust the wet until you can just barely hear it, if not until you can only feel the reverb.

That concludes the basic mixing tutorial
If you want an example mixing file setup exactly like this that works with FL Studio, you can download it Here

Comments
Post a Comment